Photography (Mobile/Smart Phone)

Apr 09, 2019 • 84 views
MOBILE PHOTOGRAPHY
Hi guys and girls as you saw above, today’s topic is mobile photography.
Disclaimer: - Use of technical terms will be there. So if you don’t understand any word, the short explanation would be there in brackets and, just put a comment below if you want a separate blog for it.
So many people today do photography whether professional or casually. Every person in this modern world would have surely done some photography (excluding the areas where technology has not reached yet like the tribal islands). Some want to make it as a career, some just want to take nice pictures.
So today this blog is just about taking nice pictures in general and here are some steps to take good pictures:-
1)Analyze what you want to shoot.
2)Show some creativity and frame your shot. (Framing is the process of placing of subject, background, and foreground in such a way that it looks pleasing to eyes like using the rule of thirds, center framing for symmetry, leading lines, etc ).
3) Use hdr whenever necessary. For example, if you have both the highlights and shadows in your shot, switch on the hdr (hdr stand for high dynamic range and what does it do is that it take a high exposure and low exposure simultaneous and combines then giving you a balanced image) .
4)Take the shot using different perspective like from below, from the top or putting some light source on the subjects face, etc and make sure that your picture conveys your story as a picture is not just a picture, It contains a story behind it and it depends on the photographer how well he/she is able to convey his story through his/her picture.
5) You should know your target audience well even if you’re a casual photographer, your audience could be your family, neighborhood, friends, peers, acquaintances, etc. So know their level of understanding and post your shot according to their level.
Best tip for taking a better shot
1) Download the google camera mod for your phone. Not all phones support it but if it does support your phone it can be a great improvement. The results are amazing, I tried it myself, in a scene where there is a lot of contrast, or in low light situations the hdr+ enhanced feature would make a night and day different as compared to the stock camera app.
2) Know your gear, in this case, phone, its advantages, and disadvantages while taking a picture. Every phone has a strong and weak point for example your phone would be great at taking landscape pictures in broad daylight due to its high megapixel count or great night time shots due to the bigger pixel size on the sensor.
3) Try shooting in RAW (raw image is the minimally/unprocessed image that your phone's camera sensor captures) The RAW image file contains lots of data and would help in better post-processing the image as more the data of image more flexibility we have during post-processing but the drawback of shooting RAW is that the file size would be large as compared to the standard jpeg, so it all depends on your choice.
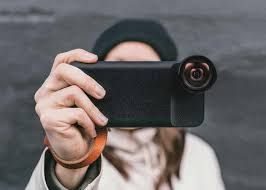
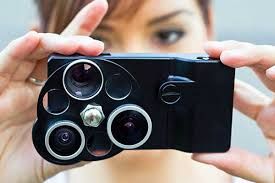
4) Use Moment lenses if available for your phone as they give you a different perspective.
(comment for a detailed blog on moment lenses).
For Example -
Wide-angle moment lens which gives you a wider field of view, best for landscape photography but the drawback is that the picture would be distorted on the sides. Mostly it depends on the specifications of the lens which would tell how would the distortion be like.
And this one has all three in one setup which is telephoto for zoom, wide-angle for a wider field of view, and another macro lens for close objects. (comment for a detailed blog on these)
5) Know about technical things like iso and shutter at beginners level. (Iso is the light sensitivity of the image sensor on your phone. Less iso means less sensitive and it is useful in situations like daylight where there's a tonne of light coming in, on the contrary be carefully while using high iso in low light as it can produce grain or noise in the image.)( On the other hand Shutter speed as the name tells is the speed of the camera shutter. A high shutter will help in capturing fast-moving objects but would reduce the amount of light hitting the sensor and vice versa, but make sure to keep your device steady while using a slow shutter as it can produce motion blur).
And at last, I would like to say that keep experimenting with your photos, change styles, do post-processing, bring creativity, and tell your story to your audience.
Thanks for reading the blog. Do Like and share if it was helpful to you in any way.
Have a nice day.
Recommended
